As with most machinery like your car, washing machine, or even just your house or yourself, cleaning is an essential maintenance step that is required to keep something functioning at full capacity. The same applies to computers.
Heat is a computer’s enemy and over time, any build-up of dust and debris will limit the computer’s cooling capacity, resulting in shorter lifespans for its components and will result in poor performance of the computer overall.
The good news is that cleaning a computer is super easy and can take only 20-30 minutes to complete. This guide has been written to cover all you need to know on how to effectively clean the inside of your computer by professional commercial cleaners.
Before You Start
Your health and protection are important, so it is essential to wear a dust mask or respirator of sorts if you want to avoid inhaling all the nasties you find when cleaning your computer. You will also want to move your computer to a well-ventilated area like near a window or door to allow fresh air to permeate the room.
This is crucial to do, especially if there is a large build-up of dust and dirt inside the computer. If you have limits on your space, then keep a vacuum nearby to clean up as you go, but do not use the vacuum cleaner to clean the inside of your computer.
The reason you shouldn’t use a vacuum cleaner to do this is that it creates static build-up on components, which could interfere with electrical components on the motherboard or video card.
The next step to take before you start the cleaning process is to turn off your PC and unplug the power cable from the rear. If you want to be extra safe, unplug everything.
Further to that, you must not open your computer while it is running or while it has any cables attached to it. It is safer to remove all peripheral cables like USB, audio, video, and any power cables from your computer before opening it up.
While keeping the power cable plugged into the computer does ground it, the tiniest amount of moisture can damage or cause issues in the future.
Whenever you are cleaning your computer and components, it is really important to avoid any static and to regularly ground yourself by touching the case or PSU housing.
Have Supplies at the Ready
There are a few essential items that you will need to clean your computer. The first item on the list is a set of hardware tools, which includes screwdrivers to open up the sides of the computer.
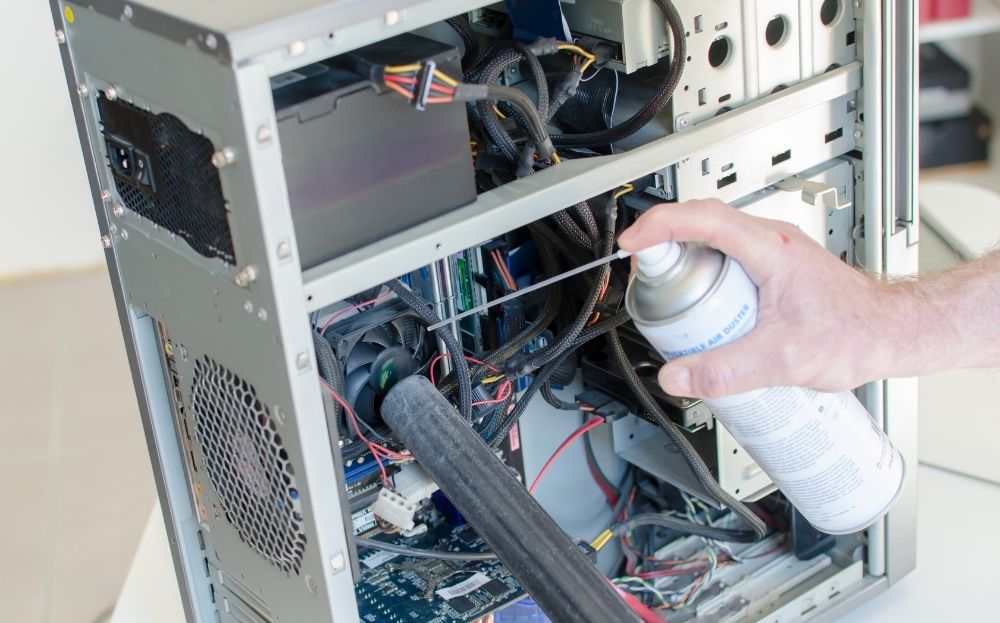
The next and most significant item used to clean your computer is a can of compressed air, which is readily available online or at your local hardware store.
Another item that can come in handy is a small paintbrush to sweep away the dust in hard-to-reach places. The next essential item is a cleaning cloth to wipe away any residues left behind.
There are a few optional items you can incorporate into your cleaning regime when cleaning your keyboard including zip ties, a pair of scissors, cotton swabs, thermal paste, and a pen or pencil. These items are not needed, but they make for a polished job overall.
Cleaning The Computer
Step 1: Open Your Case and Dismantle the Components
All computer casings are different and if this is your first time opening it, it is best practice to consult the user manual of the computer or check online how to do so for your specific model. However, in most cases, all that you have to do is unscrew a few screws and slide the side panels outward.
If your side panel is connected to a fan, it is best to unplug any power cables to completely detach the side panel. Additionally, you can remove any components that can be easily disconnected from the computer.
Most computers allow you to remove the RAM sticks, video and graphics cards as well as hard drives. This is not an essential part of dismantling or opening up your case for cleaning, but it allows you to be more thorough.
It is recommended to leave your CPU where it is, as the thermal paste used to transfer heat from the top of the processor fan will need to be reapplied every time the fan is removed.
If you have thermal paste handy, then you can replace the paste, but all the old paste must be removed first. This removal of old paste can be done with rubbing alcohol and a clean cloth.
Use the can of compressed air to clean all your components that have just been removed. Hold the trigger and aim the nozzle to release pressurized air onto the areas with a lot of dust build-up. If you have dust clumps or dust bunnies around the fan, use a pencil to hold the blades of the fan in place when blowing the air.
Step 2: Clean the Ports and Fans
After you have cleaned all the removable components with compressed air, remove the dust from the RAM slots. The most efficient way to do this is to aim the compressed air at the slot and hold it down while moving it down the entire slot. This should be repeated for each slot.
Next up is the bigger equipment inside the case such as the CPU, if you have not already removed and cleaned it, as well as your power supply unit.
Again, when cleaning fans, it is recommended to use a pen or pencil to hold the blades of the fan in place while you clean each blade from dust particles. A cotton swab can also come in handy by rubbing it against the individual blades of the fans to stick to the dust particles.
The bottom of your computer case will house the most dust build-up and so it is best practice to blow the dust particles away with your compressed air can if there is still some dust, a damp cloth that is lint-free can be used to wipe it up. This process here can be repeated several for all the nooks of your case.
If you have heavy build-up on the fans or on any of the ports, use the cotton buds dipped in rubbing alcohol to clean any extra gunk. Check the working of fans by giving them a spin to check that they spin easily.
Step 3: Decluttering Cables (Optional)
Although this step is completely optional, it is recommended for custom-built computers as the cables will not necessarily be tucked away neatly as with professionally built computers.
It is also best to keep any cables away from the fans of the CPUs. This can be done with a pack of zip ties that can go around cables.
The cables that need to be needed to first be disconnected from the computer and then when you have finished grouping them appropriately, tie the zip tie around them and tuck them away. Lastly, you will need to reconnect them to where they were previously.
Step 4: Reassembly
First, you will need to plug your cables back into their sockets and remember to reattach any components that you removed back into their rightful homes.
The last thing you need to do is slide the side panels back into place and secure them with a screwdriver and screws that you removed initially.
How Regularly Should A Computer Be Cleaned?
Depending on a few factors such as your environment, i.e. living in a dustier part of the world, you may have to clean your computer more or less frequently. Another factor that influences the frequency of cleaning the computer is the placement of the computer.
If a computer is placed on a floor – be it a carpeted, tiled, or wooden surface-this allows for dust, hair, skin, and fluff particles to get inside the computer easier. It is best practice to keep your computer on a desk or on a platform above the floor to limit the dust from entering the inside of the computer.
Additionally, if you smoke near your computer or if it is near an area of the house like the kitchen, ash or tar, and other gunk can collect inside your computer easily, so it is best to keep a computer away from that.

Furthermore, if you are a pet owner and your pet sheds, there may be a lot of excess hair that gets sucked into your computer, blocking its cooling fans and other areas of your computer.
Good practice calls for you to clean your computer every 6 to 12 months, depending on the factors mentioned above. If you ticked yes for most of them, then you should clean your computer more often-say every 3 to 6 months. Then, if your computer is getting hotter than usual, you should clean it more frequently.